Painted kitchen cabinets finished in a designer colour are a wonderful way to create a unique space and express your personality. They do however have to stand up to years of knocks and marks left from grease, colourful foods, fingerprints and other such items so here are a few cleaning guidelines to help keep your cabinets beautiful for years.
DUSTING
The best method is surprisingly straightforward: using a lint free cloth or duster, simply wipe your painted furniture clean. Not only does this keep the colour looking fresh and new, it also prevents dirt and dust from collecting on the surface which, if left to settle, will require more vigorous cleaning. Repeat this as often as possible, within reason – the cleaner you can keep your painted furniture, the longer it will stay in an optimum condition.
We also recommend undertaking this process before embarking on any of the cleaning methods detailed below to help avoid dirt and dust scratching the surface.
REGULAR CLEANING
Minor stains and lightly soiled areas are easily cleaned: mix a small amount of washing up liquid or soap (we recommend using a detergent denoted as ‘mild’ or ‘kind to hands’ as this will be more PH neutral) with warm water. Using a damp cloth, wipe your painted furniture, ensuring you take extra care with the particularly dirty areas. Once it has been cleaned, rinse the item with fresh, clean water to remove any chemicals or soap residue that may be left. Immediately dry with a lint-free cloth to prevent liquid resting on the surface and causing staining or other damage.
ITEMS TO AVOID
We do not recommend using any other cleaning solutions than those mentioned above. This is because such solutions can stain the paint of the timber beneath it, causing damage to your furniture. Furthermore, avoid cleaning accessories such as metal scourers as these will leave scratches in the paint. Prior to cleaning, you should always wipe over your furniture with a clean and dry cloth to remove anything that may be sitting on the surface (as such residue could scratch your furniture during the cleaning process).
repairing chips
As with all painted door finishes, they can chip over time, for this reason a touch up kit is supplied with your kitchen. Take care when applying the touch up paint to ensure a decent level of finish is achieved.
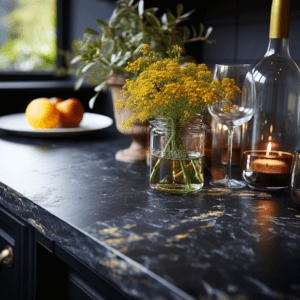
Caring for wooden worktop:
REAL WOOD WORKTOPS
Wooden work surfaces are a particularly beautiful complement to a kitchen and – when afforded the care they deserve – make a stunning feature that is both decorative and practical.
If neglected, there is a chance that timber worktops will dry out, lose their healthy lustre and, eventually, split. To keep your solid wood kitchen in best possible condition and sustain its stunning appearance, we would like to emphasise the key points of correct worktop maintenance:
OILING
Ensuring worktops are well-oiled is one of the fundamentals in keeping them looking fantastic.
Wooden worktops will be oiled at time of installation. Once installed, it is best to apply one coat each week for the first six weeks, and then apply another coat roughly every three months thereafter. Building up a sufficient coating of oil creates water resistance, and if your worktop does not have an adequate amount of protection it will begin to look dry and dull.
To test water resistance, place a drop of water on the work surface. The droplet should rest where it is; if it slowly seeps into the worktop then more oiling is required.
SPILLAGES
Any spillages of liquid or food should be mopped up quickly with a dry, clean cloth, to prevent water ingress or staining. Liquid should never be left to stand on the work surface.
CLEANING
Wooden worktops can be cleaned using a soft, lint-free cloth that has been dipped in soapy water. We strongly advise against using harsh chemicals or scouring pads when cleaning wooden surfaces.
SCRATCHES
Though we always recommend preparing food on a chopping board to protect your worktop from scratches, accidents do happen! To treat small scratches, we suggest sanding back the damaged area and then re-oiling to build up protection again. Re-oil the area regularly until the colour matches the rest of your work surface.
Caring for Tiles:
Caring for your walls and floors doesn’t have to be a chore.
Keep floors as free as possible of loose dust and grit with regular vacuuming or sweeping to reduce the sandpaper effect of dirt getting compacted into the surface and joints. Then we recommend regularly washing the floor to remove the dirt that a vacuum won’t pick up.
STONE TILE FLOORS
Be careful when you’re working with natural stone tile like slate, granite or marble. Chemicals in traditional cleaners can damage the surface of these materials. Instead, clean your stone tiles with cleaners made specifically for natural stone.
- Slate Tile: You may also use a mild detergent on slate tiles, as long as it doesn’t contain acidic properties, such as lemon or vinegar. If your slate tile is coated, avoid water spots by drying the tile right away with a soft towel.
- Marble Tile: Marble makes stunning tile, but it’s also high-maintenance. Avoid cleaning marble tile with anything that has an acidic PH level. Cleaners with lemon or vinegar should be avoided, as they can etch the surface of the tile. Also stay away from anything that may scratch the marble, such as brushes with tough bristles or scouring powders.
- Granite Tile: Like slate and marble tile, granite tile needs to be cleaned with a mild detergent that is pH-neutral. A harsh cleaner risks leaving streaks or discoloration on the tile. You also may want to buff a polished granite floor to keep it looking shiny and clean.
CERAMIC AND PORCELAIN TILE FLOORS
Ceramic and porcelain tiles are incredibly durable, and a few easy cleaning tips can keep these types of floors looking sparkling.
- Clean up loose debris: Sweep or vacuum your tile floors regularly to keep them from getting dull. Ceramic tiles may be resistant to dirt, but sand and grit can dull the glaze.
- Choose the right floor mop: Clean tile with mild detergent and clean water using a rag or chamois-type mop rather than a sponge mop. Be sure to change the water frequently while mopping; dirty water equals a cloudy floor.
- Be on the look for tile stains: If you find a discoloration, first try to determine what type of substance made the stain, then use the appropriate cleaner for the most effective clean.
- Watch for soap residue: If your tiles look hazy even after cleaning, you might be dealing with soapy residue. Remove the film with a nonabrasive all-purpose cleaner or a homemade cleaner with mild acid such as fresh lemon juice.
- Dry the tiles: Don’t let your glazed tile floors air-dry as the sitting water will form water spots. Dry the floor with a clean, lint-free cloth immediately after washing.
Caring for Taps:
You wouldn’t rub hard or sharp objects against the bodywork of your pride and joy sitting out in the driveway, so why would you do it with your lovely designer taps?
It is one of those things that you could go through life without ever knowing and get off totally fine – on the other hand, one errant scrub with too volatile a chemical-based cleaner and you could instantly discolour and damage the beautiful sheen of the taps you spent so much money and time acquiring.
GENERAL CLEANING GUIDELINES
- Rinse away any traces of soap and gently dry with a clean soft cloth after each use. Rinse completely with water and dry any overspray. This will maintain the finish and avoid water spotting.
- To remove mineral deposits, use a 50/50 solution of white vinegar and water. Do not allow the solution to soak on the product.
- Never use an abrasive material such as a brush or scouring pad to clean the surface. The use of abrasive cleaners, cleansers or disinfectants will alter the surface finish and void the warranty.
- Do not allow certain materials such as toothpaste, cologne, shaving cream, nail polish remover, vinegar, wine, drain and glass cleaners to remain on the surface. Prolonged contact will alter surface finishes and void the warranty.